This video shows you two ways to cut out and how to make chipboard embellishments. Chipboard embellishments can cost a lot, I found a small packet of tiny tags today that had a price tag on them $4.95! seriously, that’s not good.
Did you know you can make these little chipboard embellishments yourself? Two free versions is to use cereal boxes and scrap card stock. These adorable little chipboard embellishments can be used on your mixed media projects or greeting cards, just to name two.
How to cut chipboard embellishments
Dies are ideal for cutting out tags and shapes for your DIY chipboard, cuts one at a time a bit slower but does a great job for layering
ScanNcut machine is perfect, and cuts as many as you can fit on a 12×12 sheet, cuts out layered shapes perfectly, and quickly!
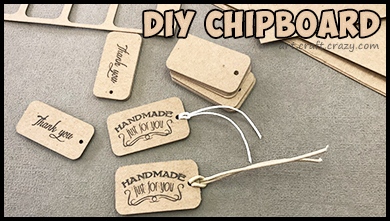
How to make chipboard
- cut your chipboard layers out, use cereal box cardboard or card stock
- stamp a sediment on the top piece, let it fully dry – even use a stamping powder to set it so it doesn’t smudge
- glue 4 layers together finishing with the stamped piece on top
- tie a piece of string through the hole
- glue it onto a card or mixed media piece
DIY Embellishments
Combine these little tags with my paper flower embellishment from book pages and you will be saving even more money on embellishments. Try it, make them for yourself.